Driver Signing Notes

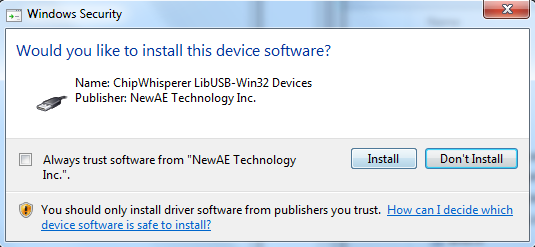
I recently wanted to sign some drivers to avoid requiring users of my ChipWhisperer device to do the usual bypass-signature deal. The end result is a sweet sweet screen like this when install the drivers:

usbsig

If you are in this situation, I wanted to add some of my own notes into the mix.

David Grayson has an awesome guide which I mostly followed, available at http://www.davidegrayson.com/signing.

The steps I followed (again from his guide basically) are:

  1. Buy a Code Signing Certificate, I selected one from GlobalSign. They will verify your company information as part of this (or name if person) which basically involves calling you.
  2. Download the certificate. You can then double-click on it to install it into your system (hint: you may want to dedicate a VM or machine to this to keep your certificate off your laptop you travel with for example).
  3. You need the ‘signtool’ and ‘inf2cat’ programs. This requires install Windows SDK + Windows WDK (which itself depends on Visual Studio 2013). There’s like 10GB of other crap you install in order to get these files. Anyway install them…
  4. Write the following in a batch file:
    "C:\Program Files (x86)\Windows Kits\8.1\bin\x86\inf2cat" /v /driver:%~dp0 /os:XP_X86,Vista_X86,Vista_X64,7_X86,7_X64,8_X86,8_X64,6_3_X86,6_3_X64
    "C:\Program Files (x86)\Windows Kits\8.1\bin\x86\signtool" sign /v /n "Your Company Name Inc." /tr http://timestamp.globalsign.com/scripts/timestamp.dll *.cat
    "C:\Program Files (x86)\Windows Kits\8.1\bin\x86\signtool" sign /v /n "Your Company Name Inc." /tr http://timestamp.globalsign.com/scripts/timestamp.dll /fd SHA256 /as *.cat
    pause
    
  5. Copy the batch file to the directory with the .inf file, and double-click it.
  6. You might need to modify your .INF file, check the output for errors – I had to update the date to be past 2013 for example. The above will work if you’ve installed the certificate on your system, as it will search for a certificate with “Your Company Name Inc.”, so you need to match that exactly.
  7. Party – you should now have a signed .cat file! Distribute the whole batch (be sure to remove the .bat file) to your customers/users.

The batch file I use above signs both a SHA1 and SHA256 signature. SHA1 is being deprecated due to collision attacks (interesting sidenote: these were used as part of the attack on Iranian centrifuges by creating digitally signed drivers).

Unfortunately SHA256 isn’t fully supported across all platforms you might need to support (see https://support.globalsign.com/customer/portal/articles/1499561-sha-256-compatibility), so for now I’m using both, which I think works?
SMD Solder Paste Stencil Creation with Silhouette Cameo

I made some additional details in a long YouTube movie:

This is far from the first blog post on this, but I wanted to write down exactly what I did to get this working on Windows 7, 64-bit with as little fussing as possible.

1. Buy Silhouette Cameo [NOTE: The v1 I used is no longer available. I’ve heard the V2 with latest firmware does work OK]

2. Decide on material. I originally used the Transparency Film but it’s a little thick, so instead ended up finding that you can buy 3 Mil drafting file individually from art stores.

3. Install USB drivers from CD that came with system – this seems to be required, as installing the software from the website alone wasn’t enough. If you need them I’ve mirrored a copy here: silhoutte_cameo_drivers.

4. Plug in Cameo device. Check if it appears as a printer:

Image
If it DOES NOT, screw around with drivers. For me it appeared as “USB Printer Support” for a while, you’ve got to try updating the drivers and forcing it to use the ones from the CD it seems. Eventually you should have success.

5. Share the Cameo device under “Printer Properties”:

Image

6. Install gerbv

7. Install pstoedit 64-bit or pstoedit 32-bit as appropriate

8. Install Ghostscript 64-bit or Ghostscript 32-bit as appropriate

9. Download copy of gerber2graphtec repo, unzip it somewhere. I’ve linked to my fork of the repo which contains some extra stuff, so if you want the original check the gerber2graphtec pmonta repo

10. Run the GUI. You’ll need to modify paths probably, or at least version numbers. Set the folder share option to match your computer name / printer share:

Image

11. If you haven’t loaded the Cameo before, basically check out the booklet that came with it. Set the cutting depth to ‘1’ on the blade and shove it into the machine. Peel back the blue sheet off the ‘cutting mat’, and stick the transparency to the mat.

12. Load a test gerber, convert it (check the output of the command line doesn’t have errors), and send onward! For me things ‘just worked’.

13. You can use the generate test square feature I added to generated the test pattern. Forces increase from 1 to 30 as it draws the squares.

Making a Simple Scope Probe Holder

Interested in a low-cost method of holding a scope probe securely against your PCB board? For this to work you’ll need a scope probe with a spring-loaded tip. I came up with this idea since the PS6000 series scope I was using from PicoScope comes with such probes. The end result looks like this:
Image

Continue reading Making a Simple Scope Probe Holder

Bed of Nails Test Bed

This is the final product, it can hold a PCB for testing without needing to have soldered any pins to it:
Image

And without the PCB mounted:
Image

I got parts from ebay seller “pingf123”. Parts used were:

“4 Edge Latches for Phototype Test Fixture PCB ICT”
“20 Chisel Spring Loaded Pogo Pin”
“spring loaded guide pin for prototype fixture PCB”

Here are a few of them spread out:
Image

The bottom PCB was drilled & bolts threaded into it (I didn’t have proper taps, but with PCB you are able to thread holes w/o them if you are forceful). The top PCB is drilled to allow the pogo pins to fit through. Getting the height of the pogo pins correct is critical, so this method let me test the height easily. When the height was correct you just screw the bolts through the top PCB to lock it all together.
Image

Soldering the pins in one row at a time. Once this was done I soldered the male headers on the bottom side, and put a lot of epoxy on it. Be careful not to get epoxy anywhere that is supposed to move!
Image


JCOP

I recently bought some Smart Cards from [[http://www.smartcardsource.com/contents/en-ca/d9_JCOP-NXP-cards.html and has some comments/issues getting them up and running. They were NXP JCOP Cards, J2A040.

Round 1: GP Shell and Card Personalization

I was using GPShell for my initial tests, you can download from [[http://sourceforge.net/projects/globalplatform/files/|Here. There is a good [[http://sourceforge.net/p/globalplatform/wiki/Home/|Wiki too.

The first test was attempting to list all the things already on the card. The results were less than satisfactory:

C:\>GPShell-1.4.4>GPShell.exe listgp211.txt
mode_211
enable_trace
establish_context
card_connect -readerNumber 1
select -AID a000000003000000
Command -> 00A4040008A000000003000000
Wrapped command -> 00A4040008A000000003000000
Response <- 6A82
select_application() returns 0x80216A82 (6A82: The application to be selected could not be found.)

As it turns out you need to have the cards personalized (or fused) before you can use them. With GP 2.1.1 you can check this with the following script:

mode_211
enable_trace
establish_context
card_connect
select -AID A000000167413000FF
card_disconnect
release_context

Running it gives this result:

C:\GPShell-1.4.4>GPShell.exe jcop_try_this.txt
mode_211
enable_trace
establish_context
card_connect
select -AID A000000167413000FF
Command -> 00A4040009A000000167413000FF
Wrapped command -> 00A4040009A000000167413000FF
Response <- 04310033000000004E5830313143000339F8736A82
select_application() returns 0x80216A82 (6A82: The application to be selected could not be found.)

The key thing to look for in the response is the 15th byte, highlighted below:

04310033000000004E5830313143000339F8736A82

If this is 00 (as here), the card is NOT personalized. You need some secret ‘Transport Key’ to do this personalization. If you just got the card as a 1-off from a vendor you might be SOL.

My vendor sent me a replacement card, as those were presumably incorrectly setup (e.g. SHOULD have been personalized before shipping to me). On to the next part:

Round 2: GP Shell with a Good Card

Alright, now with the good cards we redo the list attempt:

C:\>GPShell-1.4.4>GPShell.exe listgp211.txt
mode_211
enable_trace
establish_context
card_connect -readerNumber 1
select -AID a000000003000000
Command -> 00A4040008A000000003000000
Wrapped command -> 00A4040008A000000003000000
Response <- 6F658408A000000003000000A5599F6501FF9F6E06479100783300734A06072A864886FC6B01600C060A2A864886FC6B02020101630906072A864886FC6B03640B06092A864886FC6B040215650B06092B8510864864020103660C060A2B060104012A026E01029000
open_sc -security 1 -keyind 0 -keyver 0 -mac_key 404142434445464748494a4b4c4d4e4f -enc_key 404142434445464748494a4b4c4d4e4f // Open secure channel
Command -> 80CA006600
Wrapped command -> 80CA006600
Response <- 6985
GP211_get_secure_channel_protocol_details() returns 0x80206985 (6985: Command not allowed - Conditions of use not satisfied.)

Well damn. I don’t want to try this too many times as the card might lock I was worried.

I never figured out how to get GPShell to work, but clearly I’m improving from my initial problems.

Round 3: JCManager

Finally I found JCManager at [[http://www.brokenmill.com/2010/03/java-secure-card-manager/.

The default keys are OK in this. But you need to change the AID address to a000000003000000. With this you can hit ‘Authorize’ and should see something like this:

Open terminal ...
EstablishContext(): ...
Wait for card in a certain reader ...
Pick reader ...
**********************
Selecting Card Manager
***********************
-> 00 A4 04 00 08 A0 00 00 00 03 00 00 00
<- 6F 65 84 08 A0 00 00 00 03 00 00 00 A5 59 9F 65 01 FF 9F 6E 06 47 91 00 78 33 00 73 4A 06 07 2A 86 48 86 FC 6B 01 60 0C 06 0A 2A 86 48 86 FC 6B 02 02 01 01 63 09 06 07 2A 86 48 86 FC 6B 03 64 0B 06 09 2A 86 48 86 FC 6B 04 02 15 65 0B 06 09 2B 85 10 86 48 64 02 01 03 66 0C 06 0A 2B 06 01 04 01 2A 02 6E 01 02 90 00
************
Init Update
*************
-> 80 50 00 00 08 26 6C 8E 3C 10 69 39 05
<- 00 00 12 02 10 25 60 95 66 19 FF 02 00 02 59 8D D3 96 1B FD CC 97 F9 DF 4F 2A 6C E2 90 00
HostChallenge: 26 6C 8E 3C 10 69 39 05
CardChallenge: 59 8D D3 96 1B FD
Card Calculated Card Cryptogram: CC 97 F9 DF 4F 2A 6C E2
Derivation Data is 01 82 00 02 00 00 00 00 00 00 00 00 00 00 00 00
Host Cryptogram Data (to encrypt) 00 02 59 8D D3 96 1B FD 26 6C 8E 3C 10 69 39 05 80 00 00 00 00 00 00 00
Card Cryptogram Data (to encrypt for verification) 26 6C 8E 3C 10 69 39 05 00 02 59 8D D3 96 1B FD 80 00 00 00 00 00 00 00
S_ENC: AD C1 16 3B A2 A1 47 FB B8 4B F4 4C 86 76 FB 7D AD C1 16 3B A2 A1 47 FB
The Current session MAC key is 3E 06 B1 C8 FC FD 78 8A 57 3B 9A 98 89 D0 CA 50
The Current session DEK key is FC 01 09 6B 6D B1 3A DE E0 D4 CB 61 D0 3F D3 AA
Encrypted CardCryptoGram is 4F FC F3 9B 4A 25 56 A2 1B 69 AA 91 D8 E3 D7 44 CC 97 F9 DF 4F 2A 6C E2
Encrypted HostCryptoGram is D8 F5 B8 41 93 59 A6 45 E1 2D 3A 9A 0A 03 13 CD 5F 64 BB 10 3F 4F 87 19
-> 84 82 03 00 10 5F 64 BB 10 3F 4F 87 19 21 48 9B A9 BF 0B F8 34
<- 90 00
Authenticated


Design a FIR Filter in an FPGA in 30 mins using High Level Synthesis

Image
I’ve been working with Xilinx’s new High Level Synthesis tools built into Vivado. I’m slowly working on posting some more complete tutorials. In the mean-time here is a simple tutorial about making a Finite Impulse Response Filter on a real ADC/DAC board .