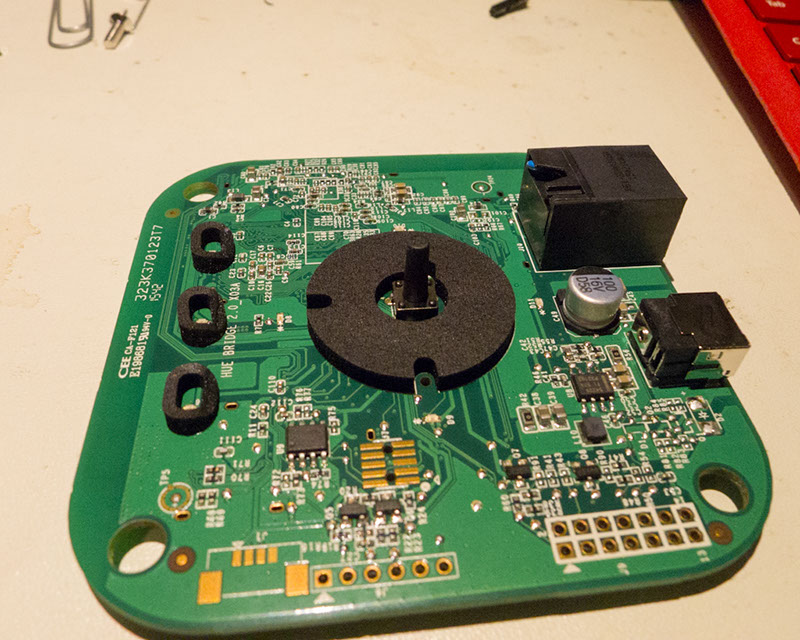
This post will briefly show you how to get a root console on the new Philips Hue Bridges (the square ones). It’s rather easy, the only special tools you require are a USB-Serial cable & a torx screwdriver.
There’s a video with full details, this post is just the specifics if you don’t want a very boring walk-through:
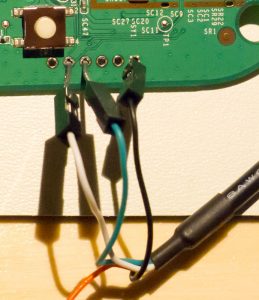
- For the serial cable (a standard 3.3V type one, DO NOT use a 5V cable), there is a 6-pin header along the bottom. Pin ‘1’ has a square footprint, and counting from pin 1 the connections are:
Pin 1 = GND
Pin 4 = RX In (connect to TX Out of your serial cable)
Pin 5 = TX Out (connect to RX in of your serial cable).
- The bottom left-corner of the 2-row header is GND. You’ll have to short that with a wire to the following test point:
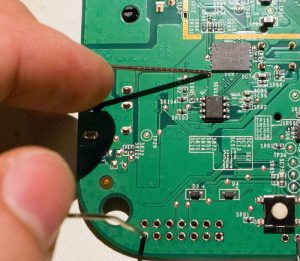
This test-point is shorted to GND with a paper-clip or wire. Click image for full-sized to see in better detail. - To get the system working, check you are getting boot messages. Now, restart the system and after you get a bit of output, short the pin. You might see some output like this:
U-Boot 1.1.4 (Sep  8 2015 - 04:08:21)

bsb002 - Honey Bee 2.0DRAM:
sri
Honey Bee 2.0
ath_ddr_initial_config(195): (16bit) ddr2 init
tap = 0x00000003
Tap (low, high) = (0x8, 0x22)
Tap values = (0x15, 0x15, 0x15, 0x15)
64 MB
Top of RAM usable for U-Boot at: 84000000
Reserving 214k for U-Boot at: 83fc8000
Reserving 192k for malloc() at: 83f98000
Reserving 44 Bytes for Board Info at: 83f97fd4
Reserving 36 Bytes for Global Data at: 83f97fb0
Reserving 128k for boot params() at: 83f77fb0
Stack Pointer at: 83f77f98
Now running in RAM - U-Boot at: 83fc8000
Flash Manuf Id 0xc8, DeviceId0 0x40, DeviceId1 0x13
flash size 0MB, sector count = 8
Flash: 512 kB
*** Warning *** : PCIe WLAN Module not found !!!
In:    serial
Out:   serial
Err:   serial
Net:   ath_gmac_enet_initialize...
Fetching MAC Address from 0x83febe80
Fetching MAC Address from 0x83febe80
ath_gmac_enet_initialize: reset mask:c02200
Scorpion ---->S27 PHY*
S27 reg init
: cfg1 0x800c0000 cfg2 0x7114
eth0: 00:03:7f:11:20:ce
athrs27_phy_setup ATHR_PHY_CONTROL 4 :1000
athrs27_phy_setup ATHR_PHY_SPEC_STAUS 4 :10
Which will then fall back to a prompt:
ath>
Good news! We can now get everything working for you. You can print the existing variables if you wish:
ath> printenv
- Set a boot delay such we can enter the menu without the boot hack:
setenv bootdelay 3
Check it works with
printenv bootdelay
and confirm you get a line like this:
bootdelay=3
Finally, save the setting with:
saveenv
You can now reset the system (use the ‘reset’ command), and confirm there is a count-down that gives you time to hit “enter” and get this prompt again.
- Now let’s fix the root password. Before doing this, I suggest you keep a copy of the old value:
printenv security
This would let you restore things back to default. Then the following will set the root password to ‘toor’:
setenv security '$1$3vGNd7Q3$ISqFeo1VkmQV6nyriUV0V/'
You may have to copy this into notepad first to ensure it all fits on one line! The quotes are critical here. Again check it works with printenv, then type saveenv to store things to disk.
If you want your own password, simply use the ‘mkpasswd’ command in Linux to generate an appropriate string.
NOTE: My original instructions (and the video) had a different ‘setenv’ command, which used SHA1 to hash the password. It turns out this stops ssh from working, so instead as suggested in the comments you can use the above MD5 hash which should work better. For posterity my original instructions were:
setenv security '$5$wbgtEC1iF$ugIfQUoE7SNg4mplDI/7xdfLC7jXoMAkupeMsm10hY9'
- Once again reset the board – assuming you used saveenv, that root password will be used by the system now. You should be able to log in with root/toor!
- Once you are in, there’s a few changes you’ll want to make. We’ll edit the file /etc/rc.local:
# vi /etc/rc.local
And add the following:
iptables -I INPUT -p tcp --dport 23 --syn -j ACCEPT
telnetd
This will open the telnet port & start the daemon on boot. Write the file and quit with :wq. You may also want to add the /etc/rc.local to the /etc/sysupgrade.conf file to avoid it being overwritten in the future.
See the comments below – someone found a way to get ‘dropbear’ to allow root login too. It’s great as SSH is much nicer to work with than telnet! This requires a different password hash than my original instructions/video.
- Try using telnet to connect now. You can find the IP of the bridge using ifconfig, but you can also get it through the Hue app.You can also try using “Philips-hue.local”, which I’d first check via ping to see if it resolves:
ping Philips-hue.local
- I’ve done the 25-July-2016 update without issue too (after first rooting the hub with an earlier version). I’ll continue to update this as updates happen.


BONUS – How did I figure this out?
The “bomb out to uboot prompt” is a known bug. Once in the prompt, I could edit the bootarg command with this:
setenv std_bootargs 'board=BSB002 console=ttyS0,115200 ubi.mtd=overlay rootfs=/dev/mtdblock:rootfs rootfstype=squashfs noinitrd init=/bin/sh';
This gives me a shell which doesn’t require a login. But many things are broken/disabled in this mode. It was however enough to find that there is another script that runs on startup which uses the uboot env variable, and copies it into the shadow file for the root password.
With this knowledge it’s easy to use mkpasswd to make an appropriate shadow file entry. Easy!
I also checked with two different Hue Bridge v2.0 devices. They contained different root passwords (at least different salts). I’ve been told the root passwords are indeed unique per device, which is a good step to stop someone from attacking your virgin Philips Hue 2.0 bridge.
As an interesting note – other people have also discovered this independently of me. Between writing this post & actually linking it from anywhere (i.e., so you could actually find it) pepe2k figured out the same thing on a forum post.
As well someone else did this same “overwrite root” attack already, but had used an external programmer to write the FLASH memory chip:
@colinoflynn Nice! I broke into mine by modifying the u-boot env in flash (before first turning it on). I’m guessing your way in was cooler?
— Kyle Temkin (@ktemkin) July 15, 2016
So it’s worth considering that many devices may be broken even if there isn’t some fancy Black Hat talk or otherwise. Most of the attacks (such as this one) are fairly well-known and pretty basic.
UPDATE: At DEFCON 24, I guess someone gave this type of attack a marketable name. You can see the idea called pin2pwn here.