Driver Signing Notes

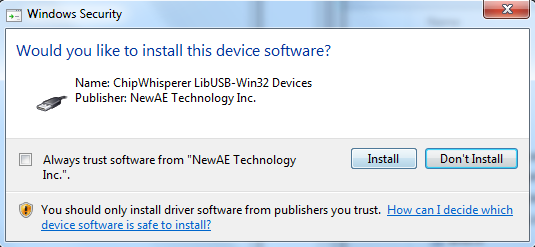
I recently wanted to sign some drivers to avoid requiring users of my ChipWhisperer device to do the usual bypass-signature deal. The end result is a sweet sweet screen like this when install the drivers:

usbsig

If you are in this situation, I wanted to add some of my own notes into the mix.

David Grayson has an awesome guide which I mostly followed, available at http://www.davidegrayson.com/signing.

The steps I followed (again from his guide basically) are:

  1. Buy a Code Signing Certificate, I selected one from GlobalSign. They will verify your company information as part of this (or name if person) which basically involves calling you.
  2. Download the certificate. You can then double-click on it to install it into your system (hint: you may want to dedicate a VM or machine to this to keep your certificate off your laptop you travel with for example).
  3. You need the ‘signtool’ and ‘inf2cat’ programs. This requires install Windows SDK + Windows WDK (which itself depends on Visual Studio 2013). There’s like 10GB of other crap you install in order to get these files. Anyway install them…
  4. Write the following in a batch file:
    "C:\Program Files (x86)\Windows Kits\8.1\bin\x86\inf2cat" /v /driver:%~dp0 /os:XP_X86,Vista_X86,Vista_X64,7_X86,7_X64,8_X86,8_X64,6_3_X86,6_3_X64
    "C:\Program Files (x86)\Windows Kits\8.1\bin\x86\signtool" sign /v /n "Your Company Name Inc." /tr http://timestamp.globalsign.com/scripts/timestamp.dll *.cat
    "C:\Program Files (x86)\Windows Kits\8.1\bin\x86\signtool" sign /v /n "Your Company Name Inc." /tr http://timestamp.globalsign.com/scripts/timestamp.dll /fd SHA256 /as *.cat
    pause
    
  5. Copy the batch file to the directory with the .inf file, and double-click it.
  6. You might need to modify your .INF file, check the output for errors – I had to update the date to be past 2013 for example. The above will work if you’ve installed the certificate on your system, as it will search for a certificate with “Your Company Name Inc.”, so you need to match that exactly.
  7. Party – you should now have a signed .cat file! Distribute the whole batch (be sure to remove the .bat file) to your customers/users.

The batch file I use above signs both a SHA1 and SHA256 signature. SHA1 is being deprecated due to collision attacks (interesting sidenote: these were used as part of the attack on Iranian centrifuges by creating digitally signed drivers).

Unfortunately SHA256 isn’t fully supported across all platforms you might need to support (see https://support.globalsign.com/customer/portal/articles/1499561-sha-256-compatibility), so for now I’m using both, which I think works?
QTabWidget in PySide Automatically Resize

When using PySide, a QTabWidget is handy. But the size of the QTabWidget is dictated by the largest item, even if it’s not visible.

Let’s assume self.tw is our tab widget. Then add this function:

from PySide.QtCore import *
from PySide.QtGui import *

class MainWindow(QMainWindow):
    def curTabChange(self, index):
        for i in range(self.tw.count()):
            if i == index:
                self.tw.widget(i).setSizePolicy(QSizePolicy.Preferred, QSizePolicy.Preferred)
            else:
                self.tw.widget(i).setSizePolicy(QSizePolicy.Ignored, QSizePolicy.Ignored)

    def myOtherFunction(self):
       etc etc etc

And in your initialization associate it with a tab change event:

self.tw = QTabWidget()
        self.tw.currentChanged.connect(self.curTabChange)

Remember to call self.curTabChange(0) probably too once you load tabs.

Getting started with GIT Revision Control

Revision Control is the most critical part of any project involving files. Otherwise you end up with tons of directories, and naming schemes like “report_final2_june.docx” along with 20 other copies.

This is best described in this 20-min clip. Sorry it’s a little long, but there is a fair amount to cover:


You can download the slide set:
Slide Set
For your reading pleasure, here are the highlights. I’ve linked to the exact moments of interest in the video rather than retype stuff I describe in the video.

What is GIT

Git is a revision control manager. Briefly, it lets you see how things changed and track those changes. Even better, it lets you do tasks like create a “branch” of the source code. You can switch back and forth between branches to deal with issues like wanting to rewrite sections of the code, while still being able to get back to the last good ‘release’ copy.
Show Me Branching

Getting stated on Your Computer

You can use GIT on any folder! It’s dead simple to do, and handy even if you will never commit things to the web. Doing so requires a few steps:

  1. Create a repository locally Show Me
  2. Commit initial fileShow Me
  3. Commit changes Show Me
  4. Do other stuff (branching, merging, etc) Show Me

Using Real Repositories

To use real remote repositories, you need a server to host them. I recommend assembla.com or bitbucket.org . bitbucket.org provides more storage, more users for free, and unlimited project sizes for university-based projects. Both are pretty cheap for commercial projects.

You want to configure a SSH key. Doing so requires four steps:

  1. Generate the key Show Me
  2. Set the key up on assembla/bitbucket Show Me
  3. Set the key up on git Show Me
  4. Set the key up to always be loaded Show Me